2D Animation (3 credits)
Week 03
justin simonich
COURSE CALENDAR | WEEK 03 CLASS OUTLINE
Topics Covered in Class:
Newton's Laws of Motion (1/2 hour)
First Law of Motion - Inertia: An object at rest tends to stay at rest and an object in motion tends to stay in motion with the same speed and in the same direction unless acted upon by an unbalanced force. Once in motion it will move in a straight line until acted upon by another external force. (Example: nudge a pencil on the desk)
Second Law of Motion - Constant Acceleration: The motion of an object accelerates in the direction of the force applied to it, relative to the force applied. The greater the force, the greater the acceleration will be. Also, the greater the mass of the object, the more inertia the object possesses and so more force will be required to move it. More weight = more inertia. (Example: kick a bowling ball and kick a tennis ball)
Third Law of Motion - Equal and Opposite Action: Each action has equal and opposite action. If a force is applied to an object, the object reacts with an equal force on the object that caused the force. (Example: rocket and it's thrust)
Momentum: Once an object is moving it takes on momentum. The amount of momentum an object possesses depends on its mass and the amount of force applied to it. More weight and force = more momentum. The heavier an object is the more force is required to start its motion and to stop it. (Example: catch a bowling ball or a fast-moving baseball)
Universal Law of Gravity: All objects, when dropped from within a vacuum, fall at the same rate. Gravity has the same and equal effect on all objects. However, outside a vacuum the effect of friction will alter the rate at which an object falls. The gravitational pull of the earth alters the initial force applied to objects. When a ball is thrown into the air vertically, it will accelerate according to the second law of motion, but then gravity will counter the initial force and cause the ball to slow down until all the initial energy is expended. Finally it will fall, picking up speed and momentum as it falls. (drop a marble and drop a feather)
Principles of Animation Part 1: Timing in Animation (1/2 Hour)
Frames Per Second (fps): The basic unit of time animators and film-makers deal with is  determined by the recording and projection rate of the individual film frame or video image.
Animation Timing: Unlike live-action filmmakers, which depends on actual recorded time, animators can construct time and determine the speed of action by using animation timing techniques, like Pacing, Phrasing and Timing of an action.
Pacing: Pacing is concerned with series of sequences and how they relate to each other in order to create a coherent whole. The pacing of an animation or film should vary from scene to scene. This allows the animator to create a sense of narrative within the sequences and play with viewer's emotional connection to the story. One scene may move slowly if the mood is sad, another may move quickly if there is physical action.
Phrasing: Phrases refers to the actions of a specific character or environment that within a sequence or scene. As a character goes through changes in action or mood, his/her/its dynamic action may speed up or slow down depending on the narrative calls for.
Timing (of an action): Timing is the period of time it takes for a specific action to take place. It is determined by the sequence of images and their relative position to the preceding and following images. The closer the images are to each other on screen, the slower the action, the greater the distance between images, the faster the speed of action.
Animation timing can vary depending on the style and type of delivery. One animation can have more than one style of timing too.
Principles of Animation 2 (1/2 hour)
The two basic elements of animation are:
Timing (where the impacts, accents, beats or hits happen)
Spacing (how close or far apart the object is spaced between the beats).
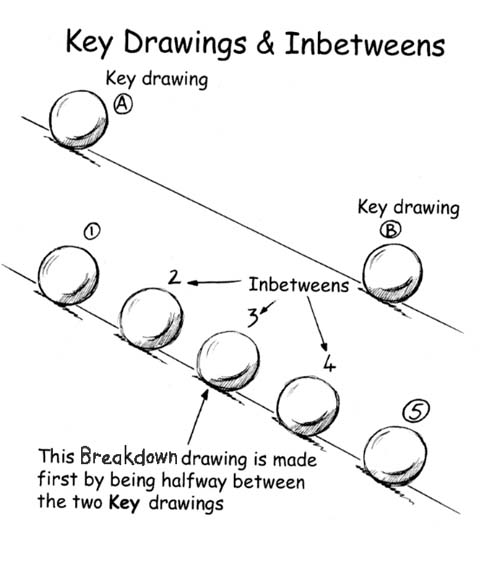
Keys and Inbetweens:
Slow out and Slow in:
Path of action: A guide used to control the motion of an action.
Software Skills: Using Flash for Traditional Animation (1/2 Hour)
Experiment - Slow Out and In (1 hour)
Flash animation using TRADITIONAL ANIMATION techniques.
(DO NOT use motion tweening at this time)
Use this template to begin.
On the first layer, animate a ball moving back and forth across the screen, using even timing.
Do this in 24 frames.
On the second layer, copy and paste your frames from layer one and modify the spacing of the keyframes, using slow out techniques to vary the timing of the movement.
On the third layer, copy and paste your frames from layer one and modify the spacing of the keyframes, using slow in techniques to vary the timing of the movement.
In a new Flash file set up keyframes for a pendulum animation. Draw the keyframes on frames 1, 24, 48 and the breakdowns on frames 12, 36.
Add inbetween frames to complete the animation using slow out and slow in.
Set the axis point to the top and center of the string.
Use the transform tool to rotate the pendulum.
Homework:
Finish Flipbook if you haven't yet. Slow in Slow out Experiment, and Pendulum Exercise.
Read pages 14-35 in Text Book.
Bring an external drive or DVD-R to backup your work.
Bring in your drawing tablet.
Reference: