COURSE CALENDAR | WEEK 04 CLASS OUTLINE
Topics Covered in Class:
Review Principles of Animation from Week 03 (15 minutes)
Principles of Animation (15 minutes)
Path of action: A guide used to control the motion of an action.
Volume: It is important to keep the volume of an object consistent during an animation. If an object looses volume it will appear to shrink. If it gains volume it will appear to grow.
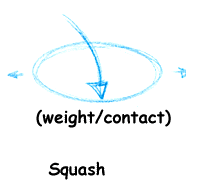
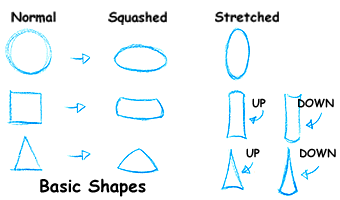
Squash: Squash creates an illusion of weight and is used as the result of impact with another object or impact with a surface.
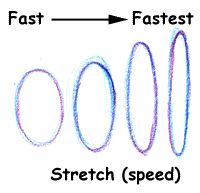
Stretch: Stretch is the opposite of squash and usually takes place just after and as a result of squash. It also imparts a sense of speed and a feeling of gravity acting upon the object. For example when an object falls or jumps it is elongated to emphasize the effects of gravity.
Examples :
Tex Avery: Bad Luck Blackie
Different shapes with squash and stretch
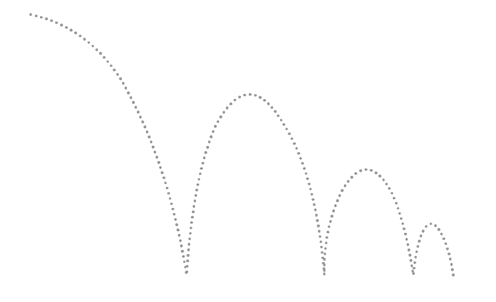
Arcs, Curves: most naturalistic actions follow a series of arcs and curves.
Most of the moves a living organism makes are non-mechanical. Almost every movement will describe an arc of some kind.
Action needs to be plotted out with paths and guides, as well as rough poses, to
determine just how high and how low the character should go in any action. Arcs
are sketched in, as the key actions are planned, to guide the eventual drawings
along this curved path.
Shooting on Ones or Twos: Shooting on twos means each drawing is held for two frames: 1 second of animation needs 12 drawings. Shooting on ones means one drawing is created for each frame of animation: 1 second of animation needs 24 drawings. Most animations are a combination of ones and twos. Use twos for normal action and ones for very fast or smooth action.
Experiment - Basic Ball Bounce (2 hours)
In Flash, we will create an animation of a ball bouncing. Use this template to start.
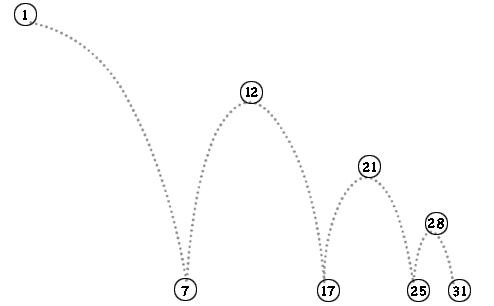
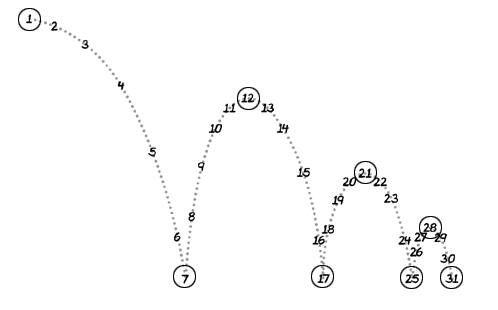
Path of Action: Create a new layer and call it path of action. Then create a keyframe in the first frame of the timeline. With the keyframe selected, draw the path of your bouncing bal using the pencil tool. Smooth the lines using the smooth tool and the selction tool. Use this drawing as a guide. (see example).
Note the extreme points of the action (when the ball is in the air and hitting the ground), these will be your Key Drawings. Mark and circle the frame number at each extreme point to represent each key drawing. These would be frames 1, 7, 12, 17, 21, 25, 28, and 32. (see example).
Timing Guide: Next we will think about the timing of our action (ball bouncing) for frames in between 1, 7, 12, 17, 21, 25, 28, 32. Think about the concepts of slow in and out. Looking at your arc of action, think about how the ball will move based on the laws of motion- gravity, momentum, etc.
Once you have determined the timing for you animation, choose the path of action layer and tick off each inbetween on the path of action and mark the frame number, just as you did with the Key Frames. Only the Key Frames are circled. (see example)
Create your drawings: Let's make a ball and turn it into a symbol, as we did last week.
Create a new layer called ball bounce. Then create a keyframe in the first frame of the timeline. With the keyframe selected, draw a small ball. Choose f8 to turn it into a graphic symbol- name it ball. Using your path of action as a guide, position your ball at the start of the path.
1) Turn on onion skinning
2) Go to the next keyframe and add a Flash keyframe. Position the drawing using the path of action.
3) Repeat this process for each keyframe.
4) After you have drawn the keyframes for each key drawing. Go back and position the inbetweens using the same technique. Remember to refer to your path of action to make sure you keep accurate timing and spacing between drawings.
Be careful not to modify the volume of your drawings as you position them.
Play your animation to make sure it bounces naturally. Feel free to adjust the position between keyframes to play around with the timing of the movement.
Adding Squash and Stretch: Adding the illusion of speed and gravity will have the animation look more lively.
Stretch: Think about where gravity starts to take hold of the ball. Use stretch to emphasis the pull of gravity towards the earth and momentum away from the earth. Use the transform tool to adjust the shape of the ball, but don't let the volume change.
Squash: Think about where the impact happens (boink, boink, boink). Here the ball should squash slightly to give the illusion of weight. Use the transform tool to adjust the shape of the ball, but don't let the volume change
.
Save and Export
Save as a FLA document to turn in
Export a SWF file.
Exercise - Movement and Timing (1 hour)
In Flash, using the same document properties as the template, create an animation of an animal moving about the screen. Draw a path of action with timing guides on layer 2 and follow it as you animate on the first layer. Vary the size of your animal and use slow out and in to change the timing to create a comedic effect. Use squash and stretch to accentuate the illusion of weight, speed and gravity.
Simply move and resize the character, don't try to create articulated movements. Do this in 48 frames.
(DO NOT use shape or motion tweening at this time)
Save as a FLA document to turn in.
Homework:
Please have the following prepared for the next class:
1.Create a path of action with timing guide of a simple action. For example, a anvil or feather falling to the ground, wagging a finger, or nodding a head.
2.Finish Ball Bounce experiment and Animal animation.
2D Animation (3 credits)
Week 04
justin simonich