2D Animation (3 credits)
Week 10
justin simonich
COURSE CALENDAR | WEEK 10 CLASS OUTLINE
Topics Covered in Class:
Lip Synchronization
It is not necessary to put each vowel or consonant into lip-sync animation.
To attempt animating each syllable in a sentence would produce only a pile of meaningless drawing.
Study your mouth in a mirror while repeating the recorded dialogue so that:
1. It will help you decide which words, syllables or sounds must be accented or emphasized.
2. It will help you select the appropriate facial expressions for complete sentences (pauses between sentences provide for changes in expression).
Listen to dialogue recording for inflection (changes in pitch and mood) and accents of the voice. Then mark the up and down inflections.
Note- head bobs can be overdone. It is better to have too few than too many. Most accents will fall on the vowels.
(Diphthongs- the union of two vowels in one syllable- are dispensed with altogether e.g. feat, coin, foul.)
The mechanics of mouth movement cover three steps for each sound:
1. start the formation of a sound.
2. mouth position during actual pronunciation.
3. close-mouth position which follows.
If a character is animating on twos, mouth action will work well on twos unless the mouth is speaking rapidly, requiring constant change in drawing. Then animate in ones.
Remember the accompanying action as head and eyes must express emotion being voiced at the particular moment. If the character cries “Ouch!”, then sock in an exaggerated expression of pain.
Spacing charts should be plotted since variations in head action are important to expression. The best way to accent an action is to introduce change of pace. This will provide time for the anticipatory action and will add emphasis to the accent. The more frames between anticipation and accent, the greater the impact.
Twelve Rules for Expression
1. Guidelines for showing the expression change:
Avoid making a fast body move while changing the expression.
Change your expression before or after the body move.
Don’t lose the expression change in an active secondary action, e.g. clothing catching up with the body move.
2. Don’t try to tell too much in one drawing. Work out the idea over a series of drawings.
3. Don’t let the facial expression conflict with the dialogue. The idea behind the words should suggest the expression.
4. Be sure you have the right staging to show all the expressions in your scene to best advantage:
Long shot, medium shot, close-up
Straight-on, ¾, Bird’s eye and Worm’s eye view.
5. Have you chosen the right expression to show what your character is thinking? Are all the parts of the head and face related to this one idea?
6. The expression of the idea behind the words must be captured throughout the whole body as well as in the face. However, remember the expression originates in the eyes.
7. It is the change of shape of the eyes that shows what the character is thinking. It is the thinking that gives the illusion of life.
8. Avoid looking up (worm’s eye view) for a frown unless it is a sinister, domineering frown.
9. Don’t hide a smile with the head tilted down too far, or behind a bi nose or moustache.
10. Eyes in close-up should move 3 FRS ahead of accent.
11. In a blink, eyes should close 3-4 FRS ahead of accent.
12. Always remember that in character animation, all the different parts of the character- head, eyes, mouth, body and limbs, clothing- start and stop at different times and move at different rates. This means you, the animator, must do two things:
(A) Put these different parts on separate levels (max. of 4 levels) and animate separately. 4 levels (or 2 or 3) combined will produce fully animated composite characters.
(B) Separate spacing charts for the different parts (one for the eyes, one for the mouth etc.) on keys. Bear in mind that the key for one part may also be an inbetween for another part. In other words, the starts and stops for different actions will overlap.
Lip Sync: Some thoughts
1. What is the point or purpose of your picture?
2. What is the purpose of each scene within the sequence?
3. Look at your storyboard. Without dialogue, what are you showing about your characters?
4. Plan all gestures, actions to be read and understood. (Silhouette, Line of Action, Acting etc.)
5. Gestures do not just have meaning, but appropriate meaning, easily understood by all people.
6. Although body gesture is often more important to an animator, facial expression is the logical center of interest to an audience.
7. Body gesture establishes the idea, facial expression clarifies, refines or punctuates it.
8. Dialogue should not be used as a crutch. We are trying to express thoughts usually though gesturing.
9. Telegraphing; show it in the body before speaking it.
10. Don’t move too much or do too much; to show expression is more important than movement.
11. Take the time to show the expression change, don’t lose it in action.
12. Much of the expression change (like action) is accomplished not in the actual change, but in the difference (contrast) between two related expressions.
13. Don’t start without a clear idea of acting and staging. After doing 6-12 thumbnails, you can find that you’ve done too much and will then need to lose a few poses.
14. Mentally rehearse at speed your gesture phrases. Analyse your own mouth in the mirror (fast and slow).
15. Whose dialogue is it? Yours or the character’s? Do mouth shapes that fit the personality.
“We are not just illustrating words; we are illustrating thoughts and ideas. The way a character walks, stands, sits, listens will reveal the meaning of his words. What we strive for is acting, not action. You are not just moving guys (or flapping lips), you are trying to make them act. And that includes every drawing in your scene, not just key poses…they have all got to have that feeling of acting.” Ollie Johnston
Subtleties in Animation Acting
No one can really teach someone how to be accomplished at the restrained performance; it’s largely a matter of personal taste and the talent to convey your performance. Here follow some thoughts, some performance-based and some technical, which might help:
1. Listen to your track carefully for any accents that can be utilized. If your scene is short and the movement contained, you may only have one major accent in it; not several strung together of equal intensity.
2. When possible, give your characters something to do while they’re performing. While you may encounter a lot of ‘talking head’ shots in a commercial, if your character has the opportunity to emote through an activity, it can shed new light on his personality. If he’s reading a book, tying a shoe, painting a door while he’s talking, how he does these things can convey character. Is he concentrating intensely? Is he off-handed about it? Measured? Haphazard? Absent-minded? Is he enjoying the activity or performing it because he has to? Are his movements’ slick? Klutzy? Hesitant?
3. Hit your idea poses strongly, but then work out subtle complexes within the pose.
4. Give your audience enough screen time to read your acting. Your poses might be great, but if there isn’t enough time to read any of them, they’re valueless. Be your own best editor.
5. Make your spacing contained enough to be able to read changes of expression. For example, you’ve decided to make the character’s eyebrows wriggle and you’ve worked it our perfectly. However, you’ve animated it on a head movement that is spaced more broadly than your eyebrow wriggle. You’ll never see the wriggle. Instead, work out a moving or traceback hold during which you move the brows- which leads us to our next point.
6. Restrict movement generally to the area you want the audience to see. If you want the audience to watch an eye movement, don’t have the arms flapping around at the same time.
7. Avoid even timing, especially on expression changes. If you go through the sheers and make a new drawing every 8 frames, you’ll wind up with mush when it’s inbetweened. Figure out timings for your actions and poses either in seconds or for the duration of a spoken phrase. Don’t be afraid to get to your ‘idea’ pose with a minimum of drawings and then work within and around the pose. Even thinking on twos generally can be limiting if you want your timing to have fluidity and snap.
8. Think of unusual ways to get an idea across that will be entertaining to watch- unusual mouth shapes and positions, interesting eye and brow combinations and altering of eye shapes, use of eyelids, finger and hand gestures, and of course body posture used expressively.
9. Think of the cumulative effect of all of your scenes which will define your character’s personality. Instead of trying to pack a zillion different attitudes into a three foot scene, settle on one or two clear ones per scene and let the total effect of all the combined scenes shape an impression in the audience’s mind.
10. Observe and absorb! Watch as much as you can in live-action, animation ad life itself to understand the different and unique ways that people can express themselves. Log this information mentally or in sketches to utilize later. Although one should try to avoid cliché, a comprehensive knowledge of cartoon and graphically drawn expression can be invaluable. Once you know the clichés, you know the starting point if you want to go in a different direction!). Another good exercise is to record something dull, like a talk show and run it fast on visual search and watch the different attitudes and poses crystallize!
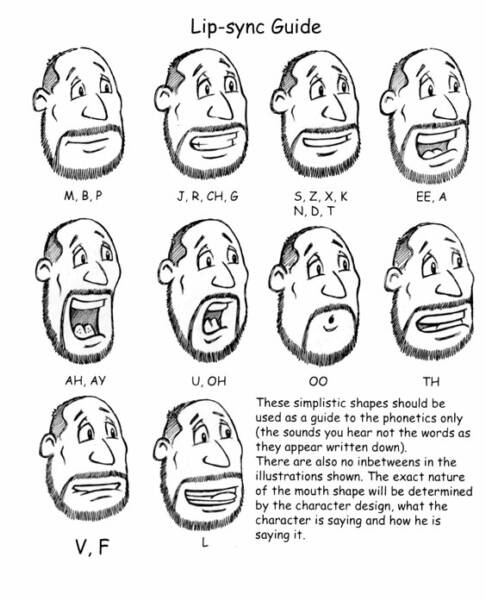
Mouth shapes for lip-synching
There are between 7 to 10 different mouth positions needed for the complete phonetic range of sounds in the English language.
We don't need to identify each and every sound in a word or phrase. Doing so can create very busy, over-animated mouth action. There are instances when you may have to "illustrate" the sound for a few frames longer. And, you may often need to place the mouth shape before the sound is actually heard. A scream, for example, may occur up to eight or ten frames early.
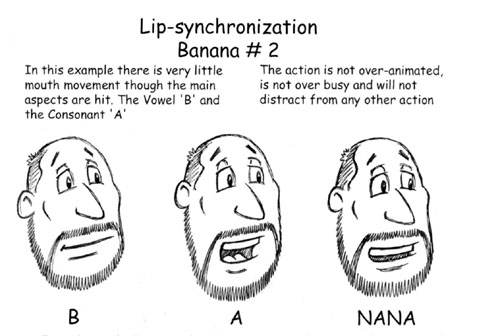
This is an example for the word: BANANA
Audio references: http://www.animationmeat.com
Learning Activity: Creating lip-sync in Flash (1 hours)
Open this tutorial file. Double click inside the head symbol and notice how the mouth symbol has several different mouth positions in its timeline.
This method involves putting all of the mouth positions for one character inside one symbol. Usually this is the mouth symbol. Each mouth position is laid out sequentially, frame by frame, next to each other. In this example, frames 1-7 have seven basic mouth positions.
When this head symbol is placed on the stage, you might notice that all of the mouths are constantly running in a loop when you view your movie. This is because the default setting in Flash sets symbols properties to "Loop". Click on the head symbol so that it's properties are active in the property box.
Then, from the drop down menu, choose "Play once" instead of
"Loop".
Click inside the head layer again. On the mouth layer you can control which keyframe and thus which mouth position is being shown at any given time. Refer to the mouth position guide which indicates on what keyframes each mouth position is located.
Grab the playhead and drag it along to hear the sound file. Don't hear anything. That's because the default setting for imported sound in Flash is "Event". Select the sound file in the timeline and in the property box change the setting from "Event" to "Stream". Now try it.
Creating a Bar Chart:
Create a new layer in the time line and call it bar chart. We will create a bar chart in the Flash Timeline using labels.
In the timeline, scrub to find where the first word starts and enter a blank keyframe. Go down to the property box, and in the input field "Frame Label", type the first word. This text will now appear above the sound layer in the timeline, letting you know what word starts at what point in the file. Try to spell the words as they sound rather than using their correct spelling. This helps you to know which mouth shape to use.
Lock your bar chart (and all other layers except head) when finished.
Synching the Sound:
Using your barchart as a guide, in timeline create a new keyframe (F6) in the mouth layer where the first sound is heard.
Click on the mouth symbol to make it active in the property box, and then type in the number of the keyframe you want to display in the box. Use the mouth position guide with corresponding frame numbers as a guide.
Frame 1: M,B and P (Closed mouth)
Frame 2: AH (Open mouth)
Frame 3: EEE, or EH
Frame 4: CONSONANTS (example: R, D, N, S etc)
Frame 5: OH, W
Frame 6: TH, L
Frame 7: F, V
We actually want the mouth position to happen one frame before the sound occurs to make it look more realistic. So, move the keyframe back one frame for each sound.
Repeat this process for the rest of the dialog.
Go back and use the modified expressions to enhance the dialog delivery.
Additional Resources:
Use this guide to create a bar chart in the Flash Timeline using labels with this guide.
Learning Activity: Creating Lipsynched Animation for Your Character (1.5 hours)
Create a new flash file: 720px x 486 px, 24 fps
Import or draw your character in Flash and remove the head from the rest of the body.
Create 7 mouth positions for your own character.
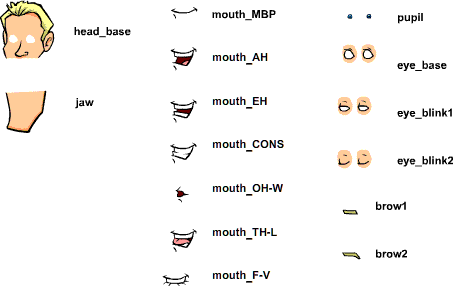
Separate the eyes, mouth and any other movable part, from the head and create unique symbols out of each, including the head*. Do this by selecting the part and choosing Convert to Symbol, selecting Graphic and giving each a name.
Remove all the symbols you just created from the stage. Now create a new symbol named head_all. Create the following layers in this order: face, mouth, pupils, brows, etc…
Create a keyframe on first frame of each layer and drag each symbol from the library to the stage, selecting the appropriate keyframe each time.
Sync to Dialog: Using your character's mouth positions, sync to one of the sounds provided or record your own. Use the mouth comp technique above. Be sure to include an eyeblink to give your character extra life.
Homework:
Finish Lips exercise and create mouth positions for your own character.
Review these tutorials for Character Animating in Flash:
*Some images and video may be from Animators Survival Kit, Toon Institute, Tom Bancroft, Brian Lemay and Cartoon Solutions.